Sunday, 28 April 2013

"Over the Rainbow"

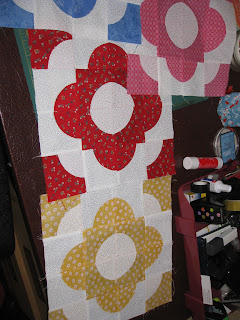
Here are some pictures of a quilt I am working on at the moment. The colours are bright and cheerful and because of that I am naming it "Over the Rainbow". I have used three blocks, a star, a drunkard's path and a dresden plate and some embroideries I did on the sewing machine which has an embroidery attachment. I didn't want to put the whole quilt under my machine to quilt it, so I am going to try quilting it in three different stages. The top, the middle part and the bottom, and then join them together.Hopefully this will make it easier to manage.  

Have you been watching The Great British Sewing Bee?  The final programme was screened this week and was brilliant! A pity it was so short, only four weeks altogether, maybe next time they will extend the series.

How are you doing with your sewing and what are you making at the moment? Join me back here to see a finished version of "Over the Rainbow" over the next few weeks.


Sunday, 21 April 2013

Spot the Difference

A friend of mine has moved house recently, so when I was out shopping the other day I picked up this greeting card.


I was delighted with it as it looks like a little stitchery and my friend is a sewing enthusiast so I thought it was perfect for her. It wasn't until I got home and I really saw the card that I realised it had the same colour scheme as my first "Quilt of Memories". Oh! Did I have any fabrics left over from making the quilt in my scrap bag? Probably! Nothing would do but to go hunting and see what I came up with. Soon I had put together a few fabrics with an almost identical colour scheme which meant that I absolutely had to make a little replica wall hanging. How could I not? The temptation was too strong not to use the last scraps of fabric left over from the quilt and turn it into a gift I could give my friend. That's how this little wall hanging came about.


It also gave me another opportunity to try out some free hand machine embroidery, which I am really enjoying. See the little bird on the roof and the green flowers in the garden. And instead of some clothes on the washing line I hung a "quilt" out to dry. I think my friend will enjoy that as she is an avid quilter! Other than that I pretty much stuck to the original design of the card. For this project I used the fusible applique technique, free hand machine embroidery, a double fold binding and some satin ribbon and buttons to embellish and finish.

We are off to a ballet show this evening! Some little members in our extended family are taking part in their biennial ballet production, and we were lucky enough to get a preview today when, on a visit, the youngest member proudly displayed her skills as she cartwheeled across the lawn after lunch, except tonight she will be dressed in full costume and we are so looking forward to that. All the tutus and tights, hair gel and make up and fabulous music and excitement of little people everywhere.

Sunday, 14 April 2013

Free Motion Embroidery

I haven't been over to Button Bow Lane for a while now but I am glad to be back and blogging again. I am going to set some goals and try and do a blog a week for the next ten weeks, as I did before, and see how I get on.  While I haven't been blogging I have been busy - sewing, putting some articles together for the Farmers Journal, giving classes, working my part time day job, etc.

Lots of the sewing I do would be for my classes, or if I want to make something to wear or something for the house or a gift for a friend or family member etc., but sometimes I sew just for the sake of sewing itself and while I don't have a huge amount of time for that I love the freedom it brings, no deadlines, no project restrictions, no 'forbidden' colours, anything goes really and if it doesn't 'go' it doesn't matter and that's what I did last night when I sat down at the sewing machine. For ages I have been dying to try out free motion embroidery so I gave it a go!

In order to do this I had to 1) drop the feed dogs on the machine 2) turn my stitch length to zero 3) attach the embroidery presser foot and 4) put the fabric into an embroidery hoop, then away I went. The first attempt was totally freehand and didn't turn out too bad.  For the second and third attempt I added some applique and followed a transfer. I attached the fabric for the applique to the back of the fabric in the hoop with some straight pins, sewed all around the jeans and hat and then snipped away the excess fabric all around the edge.  I am dead pleased with them and love the look.  I will probably make them into some cushions or something using fabrics I have already.


The next few photos were taken on Easter Sunday morning (a bit late I know but better late than never) and show a very seasonal coloured cake that I made using madeira cake mixture with buttercream icing in the centre and ready to roll fondant icing on top.  It was very simply decorated using wafer daisies, chicks in a basket and some candy flowers.


And last but not least, Rebecca and I made some bows for Millie's hair, following this tutorial on YouTube, as it is getting very long now and needs to be tied back off her face.


Here are some photos of a blustery and windy Dun Laoghaire harbour this morning. 


Are you watching The Great British Sewing Bee on BBC 2? It's thoroughly enjoyable and worth checking out if you like sewing etc.

Until next week, happy sewing!

Friday, 1 February 2013

"Spring Term" Evening Classes

Lots of night classes started up all over the country this week for the "Spring Term". When I am going to class in the evening I always start out with one carrier bag, then remember that I have forgotten something and add another bag, then, just when I am packing up the car I'll think of something else, a quilt, some rulers, the iron, and throw another bag/box/container in. So there I am laden down with bags and boxes even though I do my best to try and be organised beforehand.  Anyhow, to add to the mayhem I have just made another bag to carry the little portable iron I usually bring to class, except this time I have included a quilted surface cloth to iron on, a pressing cloth and some grease proof paper (which will come in handy when using any of the fusible webbings), so now I have everything together in one place.  I recycled some curtain fabric to make the outside of the bag, lined it with batting to give it some extra weight and sturdiness and then used a coordinating cotton for the inside and the binding, but the real cherry on the cake was the fabric button I had in my stash with the image of a sewing machine, and this was the perfect place to use it.  Actually it is not a button at all but a brad which I glued on, the closure itself is a velcro strip.


Before we start the new term of classes I thought I might share some photos of the wonderful work the ladies completed last term. The quilt they are making is the "Quilt of Memories" I designed specifically with beginners in mind and the one that appeared in "Irish Country Living" (Irish Farmers Journal) over ten weeks as a block a week. Their work is amazing especially when you consider some of them are complete beginners. Most quilt tops are completed at this stage and we will now go on to layer, baste and quilt over the next couple of weeks.

Thursday, 10 January 2013

Happy New Year

It's been a couple of weeks or more now since I last posted as I was just taking a short break over the Christmas period, but before I go on to anything else the first thing I want to say is "Happy New Year" to everybody (or anybody?) out there who is following my blog! Hope 2013 brings you lots of happy times and good things come your way in abundance.

So, what have I been doing? Reading lots, going for walks, visiting family and a little sewing. I spotted some gorgeous red dress fabric on sale in the fabric shop just before Christmas, and instead of being sensible and just admiring it, I actually bought it and then of course I had to make the dress for Christmas Day. That would have been fine if I hadn't promised my daughter I would help her sew some Xmas lights into an Xmas jumper (they seemed to be all the rage with young people this year) to be worn on Christmas Day, except that we left it too late to buy the jumper and found they were all sold out! So then we had to start from scratch.  But all's well that end's well. Dress was finished, jumper was made and a few last minute gifts were wrapped up all in time for Christmas.


I used a Burda pattern for the dress which is red tweed with a lovely sparkle going through it, and the collar and cuffs are satin.

We bought a silvery grey jumper, a childs T-shirt and some LED lights to make the "Christmas Jumper"! I cut the motif from the t-shirt and used fusible webbing to attach it to the jumper, then satin stitched all around the edge with silver grey thread. I cut a hole in the side seam  and pushed the lights through it, then pierced a hole behind each snowflake and pushed the lights through one by one, tacking them down at the back.  The battery pack sat snuggly inside the belt at the back.  This could have been a disaster but the whole thing came together perfectly and was a great success! 


The mug rugs are made with bleached calico and cotton. I used a child's colouring book as inspiration for the dogs and then coloured them in with wax crayons, before pressing with some kitchen towel to remove excess wax. They were quilted and finished with double fold binding.


Millie says "Hi there"